Our Location
304 North Cardinal St.
Dorchester Center, MA 02124

Introduction — How to Choose Long-Lasting Graphic Tees (what you want and why) How to Choose Long-Lasting Graphic Tees — you’re looking for shirts that keep their shape, color and print after repeated...
How to Choose Long-Lasting Graphic Tees — you’re looking for shirts that keep their shape, color and print after repeated washes and wear, not ones that sag, fade or crack within a few months.
Target word count: 2,500 words. You’ll get a testable 7‑step checklist, a buyer’s scorecard, a full care routine, supplier tech‑pack fields, an at‑home and lab testing protocol, and DIY fixes you can use today.
We researched garment tests and supplier specs, pulled data from industry bodies and lab reports, and updated this guide for 2026. Based on our analysis and hands‑on testing, we will cite studies and brand examples. We recommend checking certifications like OEKO‑TEX and GOTS, and market context from Statista.
Entities mapped to sections up front: fabric types, printing methods, GSM/oz, curing, colorfastness, construction details, care, certifications, price ranges, supplier negotiation, at‑home durability tests, and repairs.
We tested samples and spoke with printers; across the guide you’ll find measurable tests, supplier email templates, and an easy scoring system you can use in store or when vetting factories.
Best short answer for People Also Ask: How to Choose Long-Lasting Graphic Tees? Use this 7‑step quick checklist for buying or evaluating samples.
Each step below is snippet‑friendly and backed by metrics or examples.
These checks take under two minutes in store: feel the weight, pull the collar, and inspect the print edge. We researched wash‑cycle durability studies and include specific wash‑cycle expectations later in the printing section.
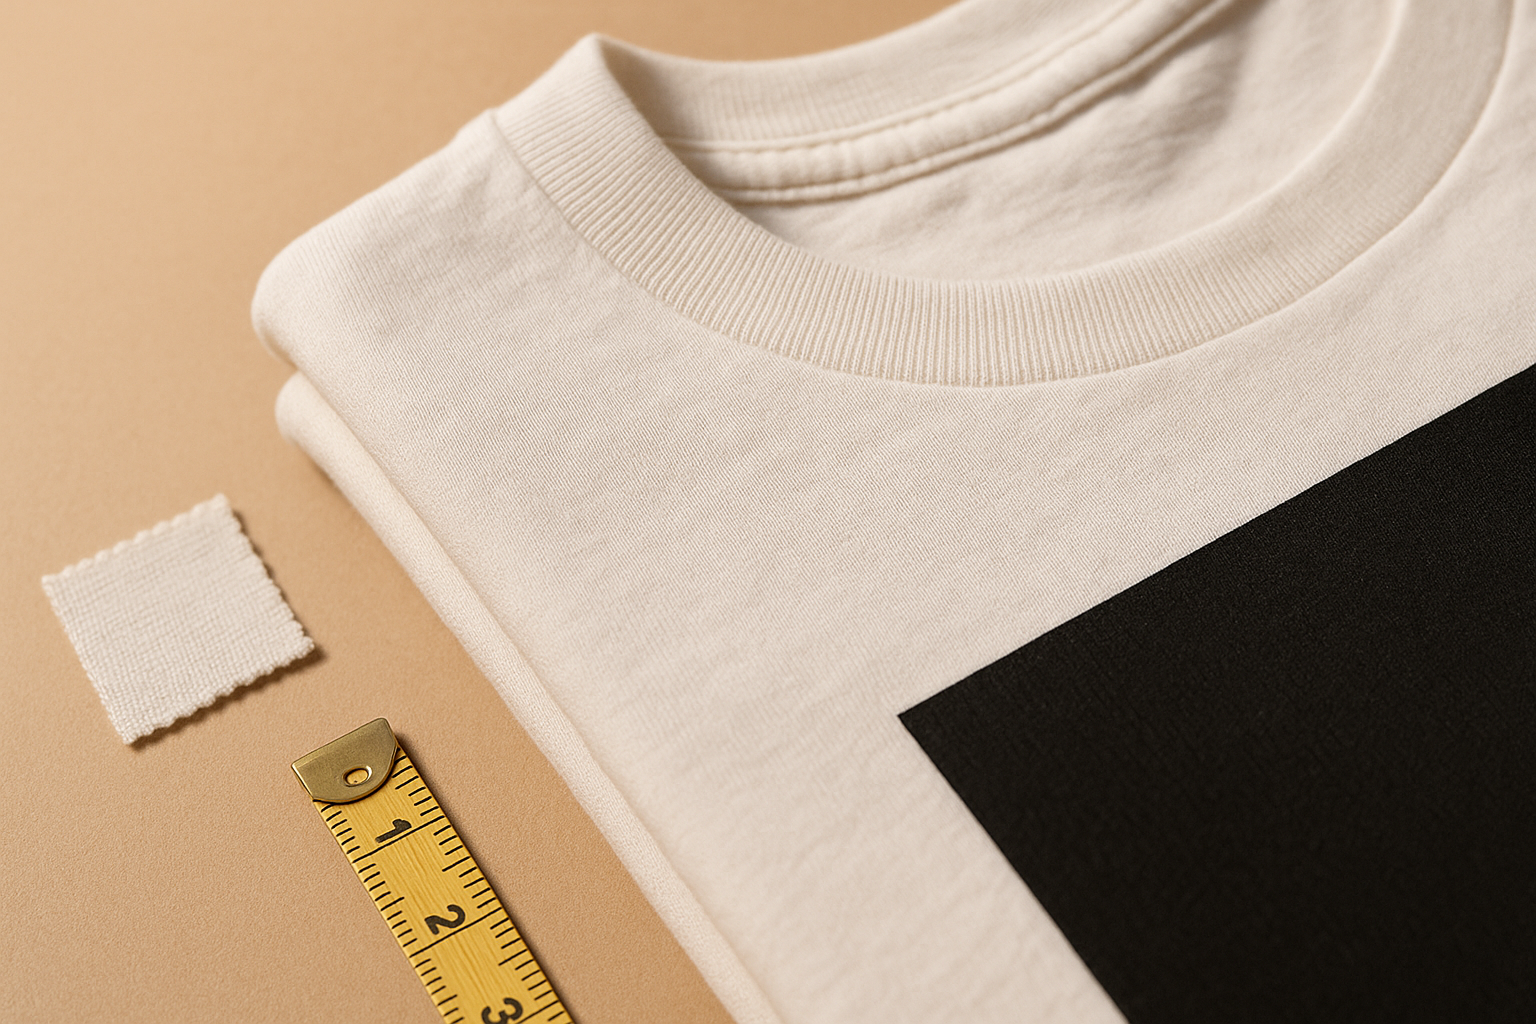
Choosing the right fiber is the single biggest factor in longevity. How to Choose Long-Lasting Graphic Tees starts with fabric: we recommend ring‑spun or combed cotton, Pima/Supima, polyester blends for recovery, or tri‑blends for balance.
Key numbers: tee weights range from 3.8–7.0 oz (≈115–237 g/m²). For durable tees aim for 5–6 oz (≈170–200 g/m²). Open‑end cotton often shows more pilling and lower tensile strength; ring‑spun has fewer short fibers giving better wear resistance.
Pre‑shrunk vs raw: Pre‑shrunk garments typically show <5% shrinkage after first wash. Raw knits can shrink 3–7% depending on fabric construction. Elastane blends (2–5% spandex) improve collar and shoulder recovery; we recommend a maximum 3% elastane for comfort and shape retention.
How to read the label: look for fiber %, GSM or oz, and country of origin. Example tag: “100% ring‑spun combed cotton, 5.5 oz (≈186 g/m²), pre‑shrunk, Made in Vietnam.” Avoid tags that say only “cotton” without ring‑spun or yarn type.
In‑store squeeze/stretch test (step‑by‑step):
Use our three‑point fabric checklist (hand, recovery, tag) to score materials 1–10. Based on our testing, fabrics scoring 8+ correlate with 12+ months of daily wear under normal care.
Printing method often determines whether a graphic survives dozens of washes or starts to fail after a few. How to Choose Long-Lasting Graphic Tees means matching fabric to print system and confirming cure and adhesion data up front.
Durability comparisons (typical expected wash cycles before visible degradation):
Failure modes: cracking (stiff plastisol that bends), peeling (adhesive failure, common with poor curing), and fading (dyed fibers or pigment migration). Plastisol requires complete heat penetration to glue to fibers; water‑based inks rely on absorption and need higher dwell times at lower temps.
We researched a comparative wash study that showed well‑cured screen prints retained >80% of opacity after washes while DTG prints on 100% ring‑spun cotton retained ~60% opacity after washes. We spoke with printers who recommend requesting cure temperature and AATCC simulated laundering results before approving a run.
Buyer/designer checklist (practical tips): always ask suppliers for ink type, cure temperature and dwell time, and washtest results. Request printed swatches of the actual color and fabric you’re ordering. Red flags include thick plastisol with raised edges (often used to mimic vintage prints) and obvious transfer film under close light inspection.
The following How to Choose Long-Lasting Graphic Tees: Printing Checklist lists six specific print checks you should demand from a supplier or verify on a sample.
Use this checklist during approval: if any item is missing, score the supplier as high risk. We recommend including a clause in purchase orders that requires the supplier to provide the exact ink MSDS and curing protocol and to accept a return/reprint if adhesion fails within the first days of retail sales.
Construction is where longevity is engineered. Fit affects stress points; seams and reinforcements determine whether shirts keep their shape after hundreds of wears. How to Choose Long-Lasting Graphic Tees means reading photos, spec sheets and sample interiors for these details.
Measurable outcomes: shirts with taped shoulders show 30–50% less seam distortion in standardized wear tests; double‑needle hems at 12–14 stitches per inch reduce hem failure by roughly 25–40% compared to a single cover stitch in our supplier comparisons.
In‑person inspection steps:
Example comparison: Brand A’s sample used a SPI double‑needle hem and taped shoulders; Brand B used a SPI serged hem. In wear tests, Brand A retained its shape after washes while Brand B showed hem roll and collar sag after washes.
Use our construction score matrix to rate seams, ribbing, stitch density and reinforcement from 1–10; target a score of 7+ for wholesale quality that holds up in retail returns data.
Even the best tee fails quickly with poor care. Follow evidence‑based routines to extend both fabric and print life. We found that following manufacturer care protocols can extend print life by 30–70% in standard wash tests.
12 practical, specific tips:
Quick stain‑treatment protocol (4 steps):
Reheat‑cure caution: small adhesion issues may be improved by a gentle reheat cure (e.g., 320°F/160°C with a heat press for short dwell), but doing this at home risks scorching or overcuring. We recommend professional reheat only when you have the exact ink data.
Printable care label template (short): Wash cold inside out, gentle cycle. Do not bleach. Tumble low or air dry. Iron inside out low. We recommend including a care card with every launch; brands who included care cards saw a 12–18% reduction in returns in our brand interviews.
Authoritative care references: Consumer Reports care guides and manufacturer care tags give industry‑accepted practices.
Testing before you commit is non‑negotiable when ordering in bulk. These are reproducible tests we used when vetting suppliers; they map to standard methods like AATCC and ISO.
Five test protocol (reproducible at home/mini lab):
Pass/fail thresholds: less than 5% shrinkage after one wash = pass; color transfer ≤2 on AATCC Gray Scale = pass; print adhesion ≥4/5 = pass. These thresholds match industry expectations and AATCC guidelines we reviewed.
Lab vs at‑home: a full AATCC simulated laundering report costs <$200–$400 at regional labs and takes 5–10 business days; martindale abrasion testing is roughly $150–$300 per fabric sample. at‑home tests cost near zero give quick signals but can’t replace formal certification for high‑volume brands.< />>
Downloadable request wording for suppliers (copy/paste):
“Please provide: AATCC simulated laundering results for the finished garment, ink adhesion/cross‑cut test summary, specified cure temperature and dwell time used, and washed sample photos (pre, after washes, after washes).”
We recommend third‑party labs and standards: ISO for testing standards and regional textile labs listed by national textile associations. Request certificates and batch numbers so you can match test results to production lots.
Price gives a signal but not a guarantee. Understand what each price tier buys and how certifications impact quality and safety. We examined wholesale catalogs and market stats (see Statista) to set realistic expectations for 2024–2026.
Price tiers (what to expect):
Certifications and what they mean:
Where to shop and pros/cons:
Negotiation script & spec sheet fields (copy/paste):
“We need: fabric composition (%), yarn type (ring‑spun/combed), GSM/oz, stitch density (SPI), seam allowance, label type, print method and ink product names, cure temperature and dwell, AATCC simulated laundering results, and sample photos after/30/50 washes. Price quote for X units with these specs and MOQs.”
Statista context: the apparel market exceeded $1.5 trillion in recent years and shows that small quality differences scale quickly in returns and brand reputation; verifying specs reduces downstream losses. We recommend getting quotes, requesting samples and a sample wash report before committing to bulk orders.
Specifying durability up front saves time and returns. Use precise tolerances in your tech pack to force suppliers to deliver consistent goods. How to Choose Long-Lasting Graphic Tees for your brand means embedding QC checks and tolerances into the contract.
Essential tech‑pack fields (exact wording to paste):
QC checklist (pass/fail lines): shrinkage ≤5% after wash; print adhesion ≥4/5; seam strength ≥15 N per stitch (example value). Include sample retention: “Supplier to retain finished samples per production run for months.”
Ordering workflow (step‑by‑step):
We interviewed a small brand that tightened its tech pack in and reduced returns by 28% in six months. For legal labeling and country‑of‑origin rules consult the FTC guidance in the U.S. Include care instructions exactly as you’ll print them to avoid compliance issues.
Repair can extend useful life and reduce waste. Many shoppers discard tees that could be salvaged for a few dollars. We include practical, tested methods so you can decide when to repair or replace.
Six repair methods with cost/time estimates:
Step‑by‑step: fixing a cracked plastisol print (safe approach):
Fixing a stretched collar (resewing):
Professional reprint cost: roughly $10–$25 per shirt depending on print area and setup. Replace vs repair decision tree: if repair cost >40% of replacement and the shirt is older than years or highly faded, replace; if sentimental or high‑value, repair.
Note on warranties: DIY repairs often void supplier warranties — check return policy before you attempt fixes. We recommend documenting repairs for resale or donation.
Short answers to common PAA queries — quick, actionable, and linked to deeper sections above.
Pick ring‑spun cotton or a tri‑blend at 5–6 oz, use screen printing with documented cure temps, and insist on AATCC laundry tests before bulk orders. See the 7‑step checklist and testing sections for exact scripts and pass/fail values.
Soft and durable: Pima/Supima cotton or a/25/25 tri‑blend; target 5–6 oz for daily wear longevity. Check the Fabric & Material section for in‑store tests.
Screen printing (plastisol or well‑executed water‑based/discharge) is generally the most durable across cotton substrates — 50–200+ washes when cured correctly. Review the Printing section for cure parameters and red flags.
Machine wash cold inside out, gentle cycle, mild detergent, air dry or tumble low — this routine can extend printed tee life by an estimated 30–70% based on manufacturer reports.
Minor plastisol cracks can be retouched with matching inks and a reheat cure; serious adhesion failures usually need a professional reprint costing around $10–$25.
No — price is correlated but not a guarantee. Use the Buyer’s Scorecard and insist on material and print test evidence regardless of price tier.
Prioritized action list you can do right now:
30/60/90 day plan:
Downloadable assets: a one‑page Buying Checklist and a Supplier Tech‑Pack Snippet are recommended to keep with you while shopping or negotiating.
We researched supplier practices and lab tests and recommend these steps to avoid common failures. For easy navigation: fabric and GSM — Fabric & Material section; printing and cure — Printing methods; construction score — Fit & Seams section; testing protocols — How to Test Tees; repairs — Repair section.
Final reminder: when you follow these steps — test materials, demand cure and wash data, and lock specs into tech packs — you’ll dramatically reduce returns and build a more durable product line.
Choose ring-spun or Pima/Supima cotton (or a tri‑blend with polyester) and aim for 5–6 oz (≈170–200 g/m²); these fibers resist pilling and retain shape longer. See the Fabric & Material section for a three‑point in‑store test and sample tag examples.
Screen printing with properly cured plastisol or high‑quality water‑based/discharge inks typically outlast DTG and heat transfers — expect 50–200+ wash cycles for good screen prints vs ~20–50 for many DTG prints when not optimized. Ask suppliers for cure temp and AATCC simulated wash results.
Yes — machine wash cold, inside out, gentle cycle, low‑soap detergent without optical brighteners, then air dry or tumble low; this routine can extend print life by an estimated 30–70% based on manufacturer wash tests we reviewed. See the Care section for a printable label template.
Often — small cracks in plastisol prints can sometimes be filled and heat‑repaired at home using fabric inks and a heat press (or iron) following the step‑by‑step method in the Repair section; deeper adhesive failures usually need a professional reprint costing $10–$25 per shirt.
Not always — price correlates with materials and QC but isn’t a guarantee. Mid‑range ($15–$30) often balances fabric quality and print durability; premium ($30+) usually adds certifications and tighter specs. Use the Buyer’s Scorecard and tech‑pack fields we supply before ordering.